Ready to get started with Theatersoft Home? Follow these steps to install on a Raspberry Pi 3 and then add the Z-Wave USB controller to control Z-Wave devices.
Checklist
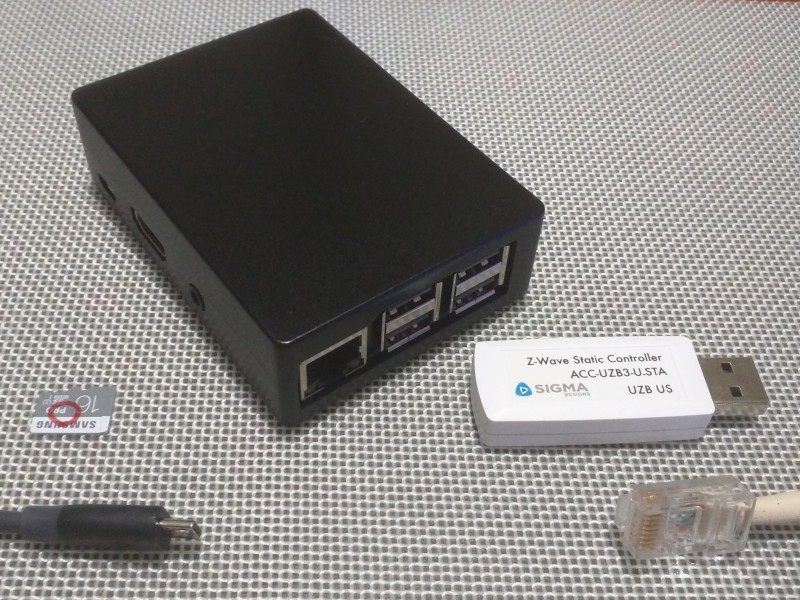
- Raspberry Pi 3 Model B
- microSD card
- 5V 2A power supply
- wired ethernet network (for WiFi, see here)
- a USB Z-Wave controller (SIGMA ACC-UZB3-U-STA or Aeotec Z-Stick Gen5 for the 908Mhz US frequency)
- a computer to prepare the boot microSD card and connect to the Pi
You should also have a domain name for the Theatersoft Client web app. We’ll use it to set up dynamic DNS updates and to create an SSL certificate for the server.
Install steps
1. Prepare the boot microSD
Download the latest Raspian Stretch Lite image and prepare the microSD using the installation guide. In particular, make sure SSH is enabled.
2. Boot and connect to the Pi
Insert the boot microSD into the Pi and connect network and power. Connect with SSH to the Pi: ssh [email protected] (password: raspberry). Read remote access for help with SSH.
3. Install Node.js
Run the following on the Pi :
curl -sL https://deb.nodesource.com/setup_8.x | sudo -E bash -
sudo apt-get install -y nodejs
4. Install Theatersoft Home
Create a directory to store your Theatersoft site configuration. Then install, configure, and deploy @theatersoft/home:
cd && mkdir example && cd example   # replace example with your site/domain name
npm install @theatersoft/home
npm explore @theatersoft/home npm run config deploy
The Theatersoft server is now running. The next step will enable you to access it from outside your home network.
5. Configure dynamic DNS and server SSL certificate
RECOMMENDED FOR TESTING ONLY
If you want to create a self-signed certificate:
cd /opt/theatersoft/.config/theatersoft
openssl req -x509 -newkey rsa:4096 -keyout server.key -out server.cer -days 365 -nodes
Accept the defaults when prompted. Skip to Restart the Theatersoft server.
Install ddclient:
sudo apt install ddclient
For a domain registered at namecheap.com, refer to How do I configure DDClient? to answer the installation prompts and edit the configuration in /etc/ddclient.conf. Otherwise, find a similar guide for your registrar.
# Configuration file for ddclient generated by debconf
#
# /etc/ddclient.conf

use=web, web=dynamicdns.park-your-domain.com/getip
protocol=namecheap
server=dynamicdns.park-your-domain.com
login=example.com
password=<not shown>
home
This will automatically update the nameserver for home.example.com. We can see if it worked by checking the end of the system log: journalctl -e:
Sep 14 20:48:01 raspberrypi ddclient[26501]: SUCCESS: updating home: good: IP address set to 50.35.xx.xx
Forward port 443 from the internet to your Pi’s internal network address in your network router’s configuration. This process will vary depending on your router.
You’re ready to enable letsencypt in config.json. Remove the underscore from the _letsencrypt property name and provide your values for domain and email.
  "letsencrypt": {
    "domain": "home.example.com",
    "email": "[email protected]",
    "production": true
  },
Restart the Theatersoft server: sudo systemctl restart theatersoft.
6. Pair Theatersoft Client
Open the Theatersoft Client app in your browser, e.g. https://home.example.com (or https://raspberrypi.local if testing without a domain name).

This is the pinpad login screen, which appears when your browser doesn’t have a valid session cookie. Click the lock icon to pair with the default password 0000. (You can change the password in config.json.) You are now connected and see a default black background since you have no camera feeds configured.
Click (or tap - the client is fully touch enabled) near the center of the page to activate the tapmenu. This is the launching point for the Theatersoft UI. Since the tapmenu is sensitive to the relative position of two taps it’s easy to use without even looking at the screen. Try tapping as fast as your device can handle!
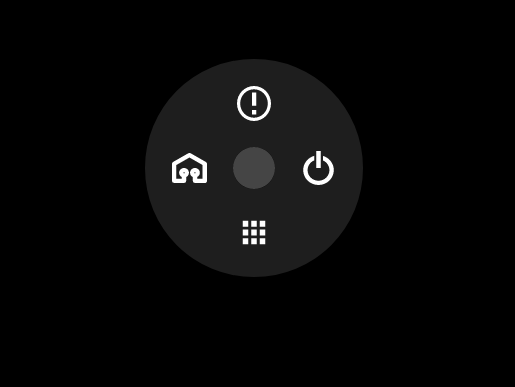
Before continuing, open the top status screen. Turn off the Enable pairing switch. Pairing should normally be disabled to block brute force attacks. Turn on Enable notifications to receive web push notifications including failed pairing attempts and new paired connections.
7. Install ZWave
Build the OpenZWave project, which is a dependency of the ZWave service:
cd ~/
wget https://github.com/OpenZWave/open-zwave/archive/v1.4.zip
unzip v1.4.zip
cd open-zwave-1.4
sudo apt install libudev-dev git-core
make
sudo make install
sudo mv /usr/local/lib/libopenzwave.so* /usr/lib/arm-linux-gnueabihf/
Add the ZWave service with nano ~/example/config.json. Insert the following object after the existing Device service:
        ,
        {
          "enabled": true,
          "module": "@theatersoft/zwave",
          "export": "ZWave",
          "name": "ZWave",
          "config": {
            "port": "/dev/ttyACM0",
            "options": {
              "Logging": true,
              "ConsoleOutput": true,
              "SaveLogLevel": 5
            }
          }
        }
Then reconfigure and redeploy. This performs all installation and restarts the server.
npm run config deploy
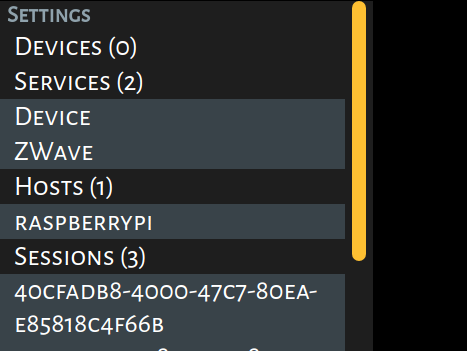
The ZWave service is now started and the client shows ZWave in the Services Settings (tap, left tap, Services):
8. Test a ZWave device
Open ZWave service settings and turn on Add Device:
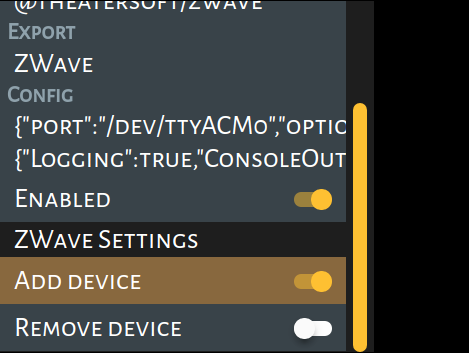
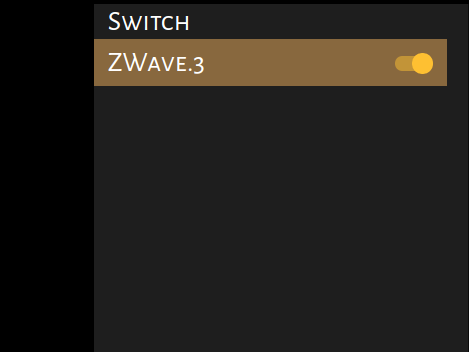
The controller is now in inclusion mode, ready to add new Z-Wave devices. Check your device to learn how to trigger include/exclude. The Zooz chime device that I’ve added required a triple press of the button inside the battery compartment. Look for the new switch in the devices list (tap, right tap, Switch).
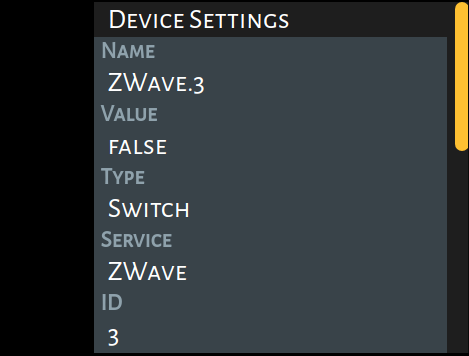
For general device settings and ZWave device settings tap elsewhere on the list item. The name setting is currently readonly in the UI but you can override it in /opt/theatersoft/.config/theatersoft/zwave.config.json.
Next steps
Learn more and join the Theatersoft Community.